![]()
![]()
![]()
![]()
Some notes on failure diagnostics / troubleshooting the Nikon 4000 and 5000 scanners.
Nikon LS-4000 and LS-5000 scanners are, in my opinion, very well built and are extremely reliable. Still some maintenance is desirable to make sure the scan image quality remains high. In particular, there is one optical component, a mirror, that is more likely (than other components) to accumulate some dust. I think it is worthy checking the mirror cleanliness if your scanner was stored in a dusty environment, or used extensively (over 10,000 scans), or if you purchased your scanner used and the seller did not clean the mirror prior to sale.
If you experience a problem and decide to troubleshoot it yourself, hopefully these notes may help you.
There is a Nikon Coolscan group on Facebook, if you have more questions, you may consider posting there there.
There is also Yahoo group devoted to Nikon Coolscan 4000 scanners:
https://groups.yahoo.com/neo/groups/Nikon4000ED/info
If you are starting to troubleshoot your scanner it is worth ruling out few simple things first:
1. Make sure the mirror is clean and clear.
2. Test the power supply. Open the scanner, remove the power supply (steps 1 through 5 in Disassembly of Nikon Super Coolscan LS-4000 and LS-5000) and make sure the power supply is working properly, it should have outputs of +5V, +12V, and -15V.
3. If the mirror and power supply are OK, then consider the sequence of the self-tests that the scanner goes through upon power-up:
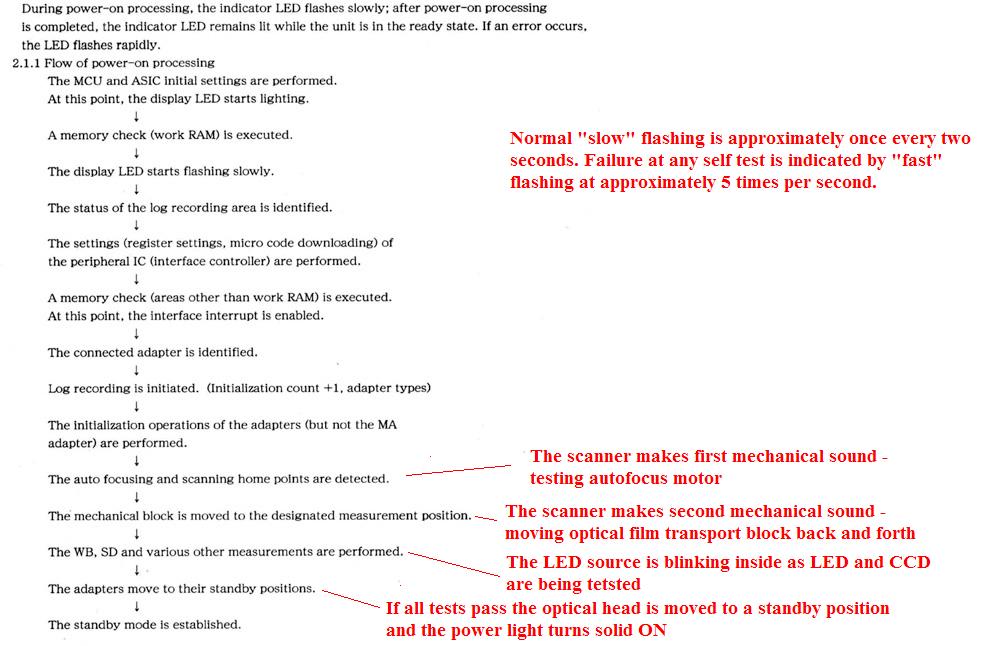
When the scanner is turned ON, it initiates a sequence of self-tests and the power light starts blinking slowly (once every two seconds). It keeps blinking at this rate as it progresses through these tests. If it fails any of these tests, it flashes the power light rapidly (at a rate of approximately 5 ties per second) and then the power light turns solid ON. If you see the power light flashing rapidly during the start up sequence, you can try to determine at which stage it happens and then try to see if you can identify the problem.
Here is a link to a video I took of a Normal power-up sequence of Nikon LS-5000 scanner.
|
Symptoms |
Problem |
Solution |
| 1. The scanner does not power up. Sometimes you would see one or two blinks of indicator (power) light after you press the power button and then nothing. Sometimes you would also see brief flash of the indicator light when you depress the power button. | The power button does NOT latch in ON position. | |
| Power supply issues. Particularly in LS-50 and LS-5000 units with serial number starting with 4 (4XXXXX), this may be caused by a bad IC in the inverter section, the part STRW6756. | Check the voltages | |
|
2. Scanner does not complete initialization properly. Power light blinks fast after the first movement sound, before the second movement sound and before testing LED/CCD (you cannot see the LED flashing red/green/blue). See here. |
Autofocus assembly problem. Most likely the proximity sensor in autofocus assembly is either dirty/obstructed or dead. |
Disassemble the scanner remove optical scan head. Check if there is any debris in the autofocus proximity sensor window. Clean if dirty. Replace if that does not help. |
|
3. Scanner does not complete initialization properly. Power light blinks fast after the second movement sound, before testing LED/CCD (you do not see the LED flashing red/green/blue). A loud whining sound is heard that would not stop until the scanner is turned off. |
The limit switch (SHARP GP1A75E optical interruptor) in the transport assembly is malfunctioning. |
Disassemble the scanner and check the wiring between the motherboard and SHARP GP1A75E optical interrupter. If there are no problems with wiring - replace the interrupter. |
|
4. Scanner does not complete initialization properly. Power light blinks fast after the second movement sound, and after attempting testing LED/CCD (you do not see the LED flashing red/green/blue). See here. |
Motherboard failure. | Test voltage regulators on the motherboard. There are 5 or 6 of them, and you can figure out the ratings from the part numbers. Replace if failed. |
|
LED failure. |
||
|
5. Scanner does not complete initialization properly. Power light blinks fast after all motor tests are complete AND after testing LED/CCD is complete (you can see the LED flashing red/green/blue.) |
Something is malfunctioning in optical light path. - A most likely cause is a dirty or misplaced imaging mirror. |
Check the imaging mirror. Clean if dirty, position properly. |
|
- The LED is mis-positioned. |
Adjust LED position. Move it forward /backward in 1/32” increments and test again. |
|
|
- CCD is mis-positioned |
Adjust CCD position. Move it up / down in 1/32” increments and test again. |
|
| I have seen few cases where a flex cable between the CCD assembly and the motherboard was ripped during unsuccessful repair. It would result in the same symptoms. | Repair or replace the flex cable. | |
|
6. The LS-4000 scanner passes power-up initialization fine (no fast blinking), but is not recognized by a computer (in Windows - Device Manager does not see it), the scan software reports that it cannot find a scanner. The failure can also manifest itself in two other different ways: - intermittent loss of communication with computer - failure to boot up properly |
There are two IC's on the motherboard, that are directly responsible for IEEE communication: TSB41AB3 and SAA7356HL. One or both may have failed. Complete loss of communication is usually an indication of failed TSB41AB3. Intermittent loss of communication is more frequently an indication of failed SAA7356HL.
|
|
| 7. LS-4000: I have seen few cases where a failed TSB41AB3 was pulling down the power supply voltages and the scanner was failing to boot up properly. | Replace TSB41AB3. | |
| 8. The LS-4000 scanner passes power-up initialization fine (no fast blinking), and is recognized by a computer (in Windows - Device Manager), BUT - Nikon Scan does NOT see it. | In every case (that I saw), it was caused by a failed SAA7356HL. | Replace SAA7356HL. |
| 9. The LS-50 (V) or LS-5000 scanner passes power-up initialization (no fast blinking), but is not recognized by a computer (in Windows - Device Manager does not see it), the scan software reports that it cannot find a scanner | In most cases this indicative of damaged VBUSIN port in EI-107 ASIC on the scanner's motherboard. | Graeme Hardie at LincolnScan proposed a work-around procedure. |
|
10. The start-up without adapter inserted into a scanner completes properly. However, when you insert MA-20/21 (or any other adapter), you will hear (at the end of adapter initialization) a loud high-pitched whirring sound. See this video. If you power up the scanner with the adapter inserted, the scanner (main stepper motor) will make a loud high-pitched whirring sound at the end of startup, see here. Sometimes the scanner will blink fast after the loud whirring sound, sometimes not.
or
Image is shifted along the long axis (image outside frame). |
Both of this are indicative of the main stepper motor failure. For some
reason this failure is prevalent in late production number (SN4XXXXX) LS-50
and LS-5000. If it is the second symptom (image is shifted along the long axis), this could also be caused by a slipping gears, see the cells below. |
Replace the main
stepper motor. The replacement procedure is fairly straightforward, the problem is a replacement motor. I could not find a suitable motor, so I have to scavenge older (cheaper) models for these, |
| 11. Scanner stops working with SF-200 / SF-210 batch loader adapters. When you insert SF-210 into the scanner - the power light blinks few times but no motor sounds occur. The scanner reports failure to load film |
Possible failures: - Failed motor in SF-200/SF-210 - Failed driver IC on the scanner motherboard |
Replace the motor in SF-200/SF-210 (original Minebea part PPN13KA11C - good replacement is PPN13PB11C2) Replace U119 on the motherboard: NEC D16805 (Monolithic H-Bridge Driver) |
| 12. Scanner makes loud grinding noises when SA-21 is inserted, see here. | - Failed driver IC on the scanner motherboard | Replace U120 on the motherboard: NEC A1603C (Stepper Motor Driver) |
|
13. Image is shifted along the long axis (image outside frame). |
Possible failures:
- main stepper motor is bad
- the gear is slipping on the main stepper motor shaft
- leadscrew gear slipping on the leadscrew shaft. |
Disassemble the scanner remove optical scan head. Replace the main stepper motor.
Take the gear in question off the metal shaft. Apply cyanoacrylate (superglue) and reattach it. |
|
14. Image is tilted. |
CCD is mis-positioned (angular) |
Adjust CCD angle. Move one side up / down in 1/32” increments and test again |
|
15. Image is shifted along the short axis. |
CCD is in a wrong position |
Adjust CCD position. Move it left / right in 1/32” increments and test again |
| 145. Image is stretched (has wrong aspect ratio). | imaging lens is in a wrong position | Adjust the position the imaging lens. Move it so that the gap is 3.8mm, see here. |
| 16. Image is doubled | Imaging mirror was placed wrong side in. | Flip the mirror to make sure is placed with correct side facing in. See photo over set 8) here. The mirror should be sitting in the housing at an angle, reflective surface down (if the scanner is placed upside down as in my instructions). |